Kaleido Standard Roasting Guide
Kaleido Roasting Guide
Recommended Roasting Capacity per Batch for All Kaleido Series M Coffee Roasters:
M1 | 150g |
M2 | 300g |
M6 | 500g |
M10 | 750g |
Roasting steps for all 4 models are nearly the same as the followings if inputting the above recommended capacity.

Stage 1: Preheat
It is suggested to preheat for 20 mins in order to heat the bean drum and the whole chamber up well, whether you are having a single roast or multiple ones.
Set “SV”(Temp set) at 180℃; “Air” at “30”; “Drum” at “90”. Then start heating. (PS: “Bruner” would adjust itself automatically while preheating.)
Stage 2: Charge
Click “Charge” before letting beans in. BT would go down the moment green beans get inside. TP, short for Turning Point, would be marked automatically once BT is stabilized. And TP ranging from 80-120℃ is normal. Its exact temp is relevant to the real roasting capacity.
Set “Burner” at “80”; “Air” at “30” and “Drum” at “90” after TP is marked till the Dry End at 155℃.
Stage 3: Dry End
Dry End (DE) comes at 150-160℃. The dehydration period starts from TP and ends at DE. Beans will have a flavor of astringency and hay-wood chip if not dehydrated well enough.
Take beans out for observation via sampler. Click “DRY END” after beans turns yellow. Starting from 155℃, decrease “Burner” 5% when BT goes up 5°C each time. Meanwhile, increase “Air” 5% when BT goes up 10°C each time.
Stage 4: First Crack
5 cracking sounds in a row mark the start of first crack. FC Time would be recorded immediately after “FC START” is pressed.
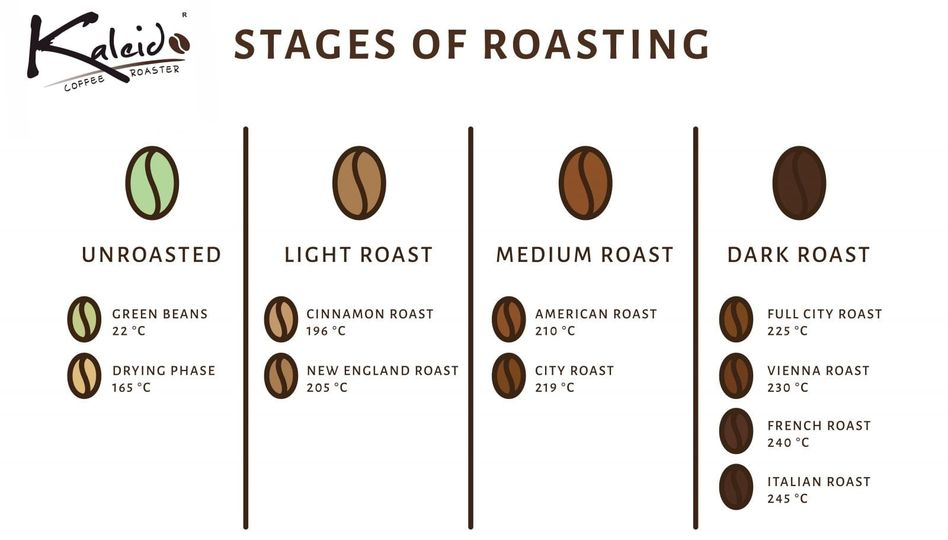
You would get medium roasted beans if letting beans out when FC Time records 1:30 and BT reaches around 200℃. And would have medium and dark roasted beans if BT increases to 210℃.
3 Principles of Coffee Bean Roasting:
Prin. 1: Relatively high level of heat should be provided in the early stages of bean roasting.
Prin. 2: The development of BT should always be at a slow pace.
Prin. 3: First crack should occur at 75%-80% of the way throughout the roasting process.

